
newrole -r role_r -t domain_t (there is usually only a single domain allowed for a given role, the -t parameter can thus often be left out). This command authenticates you by asking you to type your password. This feature forbids programs to automatically switch roles. Such changes can only happen if they are explicitly allowed in the SELinux policy.
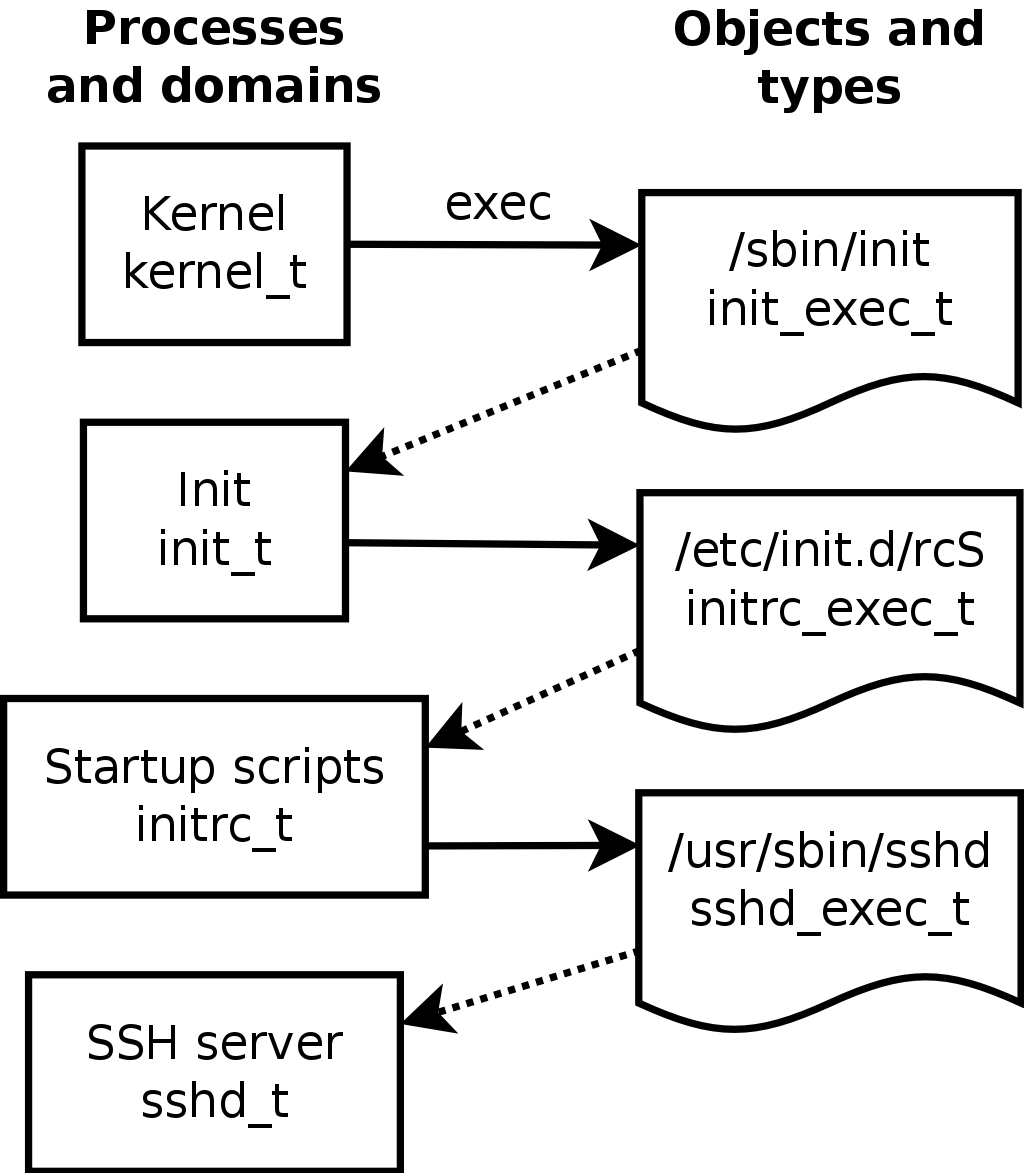
ssh is labeled with ssh_exec_t, and when the program starts, it automatically switches to the ssh_t domain). This automatic domain transition mechanism makes it possible to grant only the rights required by each program. It is a fundamental principle of SELinux.
apt install selinux-basics selinux-policy-default auditd command will automatically install the packages required to configure an SELinux system.
unconfined module (modules management is detailed further in this section).
fixfiles relabel.
selinux=1 security=selinux parameter to the Linux kernel. The audit=1 parameter enables SELinux logging which records all the denied operations. Finally, the enforcing=1 parameter brings the rules into application: without it SELinux works in its default permissive mode where denied actions are logged but still executed. You should thus modify the GRUB bootloader configuration file to append the desired parameters. One easy way to do this is to modify the GRUB_CMDLINE_LINUX variable in /etc/default/grub and to run update-grub. SELinux will be active after a reboot.
selinux-activate script automates those operations and forces a labeling on next boot (which avoids new non-labeled files created while SELinux was not yet active and while the labeling was going on).
semodule command. Furthermore, you must be able to define the roles that each user can endorse, and this can be done with the semanage command.
/etc/selinux/default/. Unlike other configuration files that you can find in /etc/, all those files must not be changed by hand. You should use the programs designed for this purpose.
/usr/share/selinux/default/ directory. To enable one of these modules in the current configuration, you should use semodule -i module.pp.bz2. The pp.bz2 extension stands for policy package (compressed with bzip2).
semodule -r module. Finally, the semodule -l command lists the modules which are currently installed. It also outputs their version numbers. Modules can be selectively enabled with semodule -e and disabled with semodule -d.
#semodule -i /usr/share/selinux/default/abrt.pp.bz2libsemanage.semanage_direct_install_info: abrt module will be disabled after install as there is a disabled instance of this module present in the system. #semodule -laccountsd acct [...]#semodule -e abrt#semodule -d accountsd#semodule -labrt acct [...]#semodule -r abrtlibsemanage.semanage_direct_remove_key: abrt module at priority 100 is now active.
semodule immediately loads the new configuration unless you use its -n option. It is worth noting that the program acts by default on the current configuration (which is indicated by the SELINUXTYPE variable in /etc/selinux/config), but that you can modify another one by specifying it with the -s option.
semanage command.
-a to add, -d to delete, -m to modify, -l to list, and -t to indicate a type (or domain).
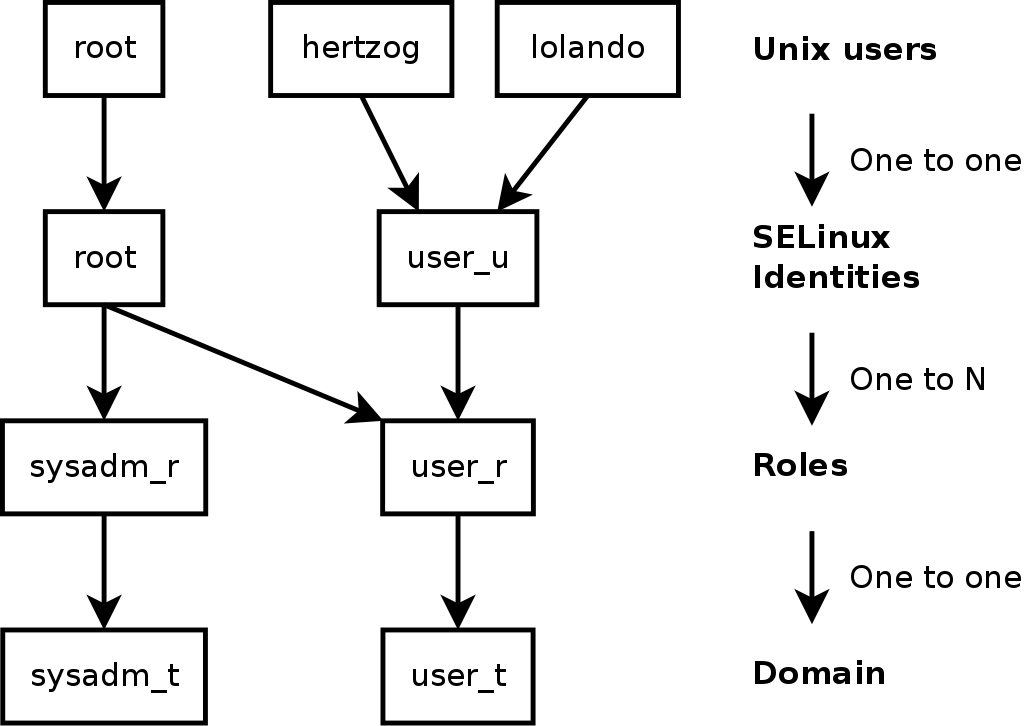
semanage login -l lists the current mapping between user identifiers and SELinux identities. Users that have no explicit entry get the identity indicated in the __default__ entry. The semanage login -a -s user_u user command will associate the user_u identity to the given user. Finally, semanage login -d user drops the mapping entry assigned to this user.
#semanage login -a -s user_u rhertzog#semanage login -lLogin Name SELinux User MLS/MCS Range Service __default__ unconfined_u s0-s0:c0.c1023 * rhertzog user_u s0 * root unconfined_u s0-s0:c0.c1023 * #semanage login -d rhertzog
semanage user -l lists the mapping between SELinux user identities and allowed roles. Adding a new identity requires to define both the corresponding roles and a labeling prefix which is used to assign a type to personal files (/home/user/*). The prefix must be picked among user, staff, and sysadm. The “staff” prefix results in files of type “staff_home_dir_t”. Creating a new SELinux user identity is done with semanage user -a -R roles -P prefix identity. Finally, you can remove an SELinux user identity with semanage user -d identity.
#semanage user -a -R 'staff_r user_r' -P staff test_u#semanage user -lLabeling MLS/ MLS/ SELinux User Prefix MCS Level MCS Range SELinux Roles root sysadm s0 s0-s0:c0.c1023 staff_r sysadm_r system_r staff_u staff s0 s0-s0:c0.c1023 staff_r sysadm_r sysadm_u sysadm s0 s0-s0:c0.c1023 sysadm_r system_u user s0 s0-s0:c0.c1023 system_r test_u staff s0 s0 staff_r user_r unconfined_u unconfined s0 s0-s0:c0.c1023 system_r unconfined_r user_u user s0 s0 user_r #semanage user -d test_u
/srv/www/ file hierarchy, you could execute semanage fcontext -a -t httpd_sys_content_t "/srv/www(/.*)?" followed by restorecon -R /srv/www/. The former command registers the new labeling rules and the latter resets the file types according to the current labeling rules.
semanage port -m -t http_port_t -p tcp 8080.
getsebool utility can be used to inspect those options (getsebool boolean displays one option, and getsebool -a them all). The setsebool boolean value command changes the current value of a Boolean option. The -P option makes the change permanent, it means that the new value becomes the default and will be kept across reboots. The example below grants web servers an access to home directories (this is useful when users have personal websites in ~/public_html/).
#getsebool httpd_enable_homedirshttpd_enable_homedirs --> off #setsebool -P httpd_enable_homedirs on#getsebool httpd_enable_homedirshttpd_enable_homedirs --> on
/usr/share/doc/selinux-policy-doc/html/) and sample files that can be used as templates to create new modules. Install those files and study them more closely:
$cp /usr/share/doc/selinux-policy-doc/Makefile.example Makefile$cp /usr/share/doc/selinux-policy-doc/example.fc ./$cp /usr/share/doc/selinux-policy-doc/example.if ./$cp /usr/share/doc/selinux-policy-doc/example.te ./
.te file is the most important one. It defines the rules. The .fc file defines the “file contexts”, that is the types assigned to files related to this module. The data within the .fc file are used during the file labeling step. Finally, the .if file defines the interface of the module: it is a set of “public functions” that other modules can use to properly interact with the module that you're creating.
myapp_domtrans”) controls who can execute the application. The second one (“myapp_read_log”) grants read rights on the application's log files.
.te file. You should thus declare all the types that you use (with the gen_require macro), and use standard directives to grant rights. Note, however, that you can use interfaces provided by other modules. The next section will give more explanations about how to express those rights.
Пример 14.3. example.if File
## <summary>Myapp example policy</summary>
## <desc>
##      <p>
##              More descriptive text about myapp.  The desc
##              tag can also use p, ul, and ol
##              html tags for formatting.
##      </p>
##      <p>
##              This policy supports the following myapp features:
##              <ul>
##              <li>Feature A</li>
##              <li>Feature B</li>
##              <li>Feature C</li>
##              </ul>
##      </p>
## </desc>
#

########################################
## <summary>
##      Execute a domain transition to run myapp.
## </summary>
## <param name="domain">
##      <summary>
##      Domain allowed to transition.
##      </summary>
## </param>
#
interface(`myapp_domtrans',`
        gen_require(`
                type myapp_t, myapp_exec_t;
        ')

        domtrans_pattern($1,myapp_exec_t,myapp_t)
')

########################################
## <summary>
##      Read myapp log files.
## </summary>
## <param name="domain">
##      <summary>
##      Domain allowed to read the log files.
##      </summary>
## </param>
#
interface(`myapp_read_log',`
        gen_require(`
                type myapp_log_t;
        ')

        logging_search_logs($1)
        allow $1 myapp_log_t:file read_file_perms;
')
example.te file:
policy_module(example,1.0.0)# a non-base module name must match the file name ######################################## # # Declarations # type myapp_t;
type myapp_exec_t; domain_type(myapp_t) domain_entry_file(myapp_t, myapp_exec_t)
type myapp_log_t; logging_log_file(myapp_log_t)
type myapp_tmp_t; files_tmp_file(myapp_tmp_t) ######################################## # # Myapp local policy # allow myapp_t myapp_log_t:file { read_file_perms append_file_perms };
allow myapp_t myapp_tmp_t:file manage_file_perms; files_tmp_filetrans(myapp_t,myapp_tmp_t,file)
|
The module must be identified by its name and version number. This directive is required.
|
|
If the module introduces new types, it must declare them with directives like this one. Do not hesitate to create as many types as required rather than granting too many useless rights.
|
|
Those interfaces define the myapp_t type as a process domain that should be used by any executable labeled with myapp_exec_t. Implicitly, this adds an exec_type attribute on those objects, which in turn allows other modules to grant rights to execute those programs: for instance, the userdomain module allows processes with domains user_t, staff_t, and sysadm_t to execute them. The domains of other confined applications will not have the rights to execute them, unless the rules grant them similar rights (this is the case, for example, of dpkg with its dpkg_t domain).
|
| logging_log_file is an interface provided by the reference policy. It indicates that files labeled with the given type are log files which ought to benefit from the associated rules (for example, granting rights to logrotate so that it can manipulate them).
|
|
The allow directive is the base directive used to authorize an operation. The first parameter is the process domain which is allowed to execute the operation. The second one defines the object that a process of the former domain can manipulate. This parameter is of the form “type:class“ where type is its SELinux type and class describes the nature of the object (file, directory, socket, fifo, etc.). Finally, the last parameter describes the permissions (the allowed operations).
Permissions are defined as the set of allowed operations and follow this template: { operation1 operation2 }. However, you can also use macros representing the most useful permissions. The /usr/share/selinux/devel/include/support/obj_perm_sets.spt lists them.
The following web page provides a relatively exhaustive list of object classes, and permissions that can be granted.
|
avc: denied { read write } for pid=1876 comm="syslogd" name="xconsole" dev=tmpfs ino=5510 scontext=system_u:system_r:syslogd_t:s0 tcontext=system_u:object_r:device_t:s0 tclass=fifo_file permissive=1
Таблица 14.1. Analysis of an SELinux trace
| Message | Description |
|---|---|
avc: denied | An operation has been denied. |
{ read write } | This operation required the read and write permissions. |
pid=1876 | The process with PID 1876 executed the operation (or tried to execute it). |
comm="syslogd" | The process was an instance of the syslogd program. |
name="xconsole" | The target object was named xconsole. Sometimes you can also have a “path” variable — with the full path — instead. |
dev=tmpfs | The device hosting the target object is a tmpfs (an in-memory filesystem). For a real disk, you could see the partition hosting the object (for example, “sda3”). |
ino=5510 | The object is identified by the inode number 5510. |
scontext=system_u:system_r:syslogd_t:s0 | This is the security context of the process who executed the operation. |
tcontext=system_u:object_r:device_t:s0 | This is the security context of the target object. |
tclass=fifo_file | The target object is a FIFO file. |
allow syslogd_t device_t:fifo_file { read write }. This process can be automated, and it is exactly what the audit2allow command (of the policycoreutils package) offers. This approach is only useful if the various objects are already correctly labeled according to what must be confined. In any case, you will have to carefully review the generated rules and validate them according to your knowledge of the application. Effectively, this approach tends to grant more rights than are really required. The proper solution is often to create new types and to grant rights on those types only. It also happens that a denied operation isn't fatal to the application, in which case it might be better to just add a “dontaudit” rule to avoid the log entry despite the effective denial.
example.if, example.fc, and example.te) match your expectations for the new rules, rename them to myapp.extension and run make NAME=devel to generate a module in the myapp.pp file (you can immediately load it with semodule -i myapp.pp). If several modules are defined, make will create all the corresponding .pp files.