
/etc/postfix/main.cf.
mail.falcot.com. هذا هو السؤال الوحيد الذي يطرح افتراضياً، لكن الإعداد الناتج ليس كاملاً كفاية بالنسبة لحاجات فلكوت، لذلك استدعى مديرو النظم الأمر dpkg-reconfigure postfix حتى يتمكنوا من تخصيص المزيد من المتغيرات.
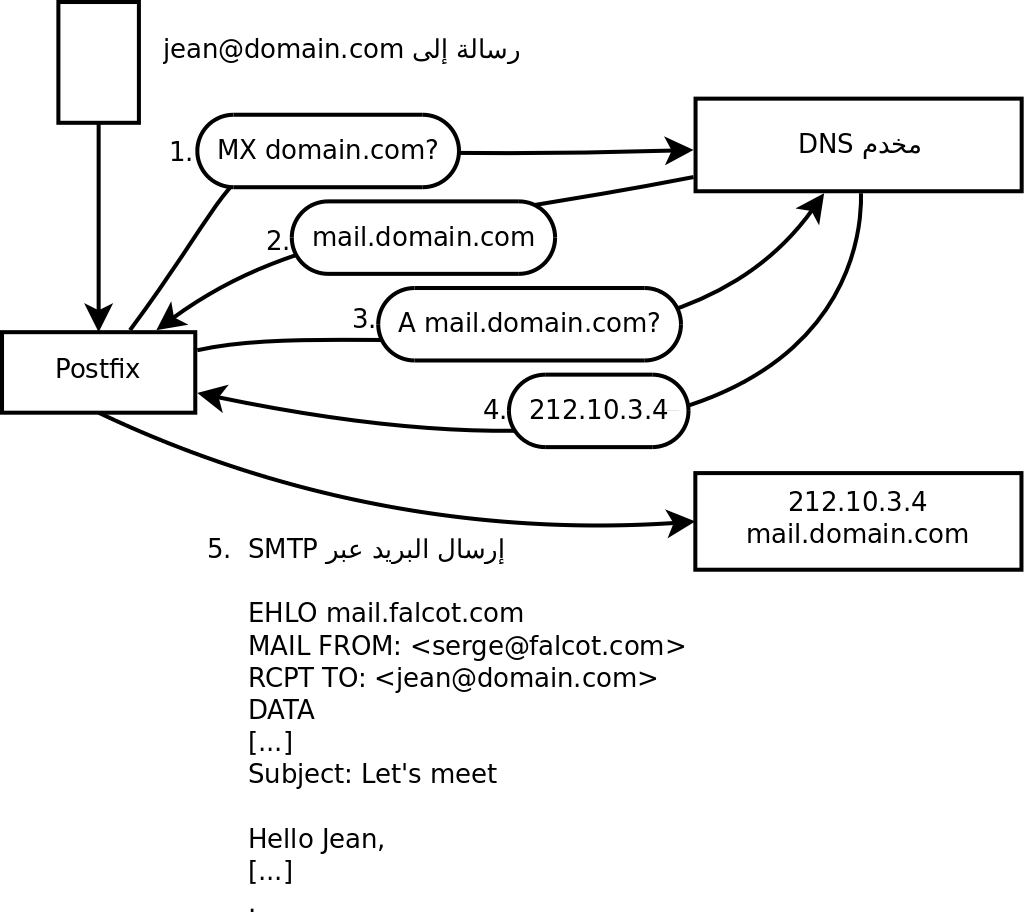
localhost. لكن يجب إضافة النطاق الرئيسي falcot.com يدوياً. بصورة عامة، يجب إجابة هذا السؤال بإعطاءه جميع أسماء النطاقات التي سيعمل هذا المخدم معها كمخدم MX؛ بكلمات أخرى، جميع أسماء النطاقات التي يبين مخدم DNS أنها تستطيع استقبال البريد الإلكتروني. ينتهي المطاف بهذه المعلومات في المتغير mydestination في الملف /etc/postfix/main.cf (ملف الإعداد الرئيسي لمخدم Postfix).
192.168.0.0/16 إلى الإجابة الافتراضية. إذا لم يطرح عليك هذا السؤال، فالمتغير الموافق له في ملف الإعداد هو mynetworks، كما هو واضح في المثال أدناه.
procmail. هذه الأداة تسمح للمستخدمين بفرز بريدهم الإلكتروني الوارد وفقًا للقواعد المخزنة في ملف ~/.procmailrc . يقترح كل من Postfix و Exim4 procmail بشكل افتراضي ، ولكن هناك بدائل مثل maildrop أو مرشحات منخل(Sieve).
مثال 11.1. ملف /etc/postfix/main.cf الأولي
# See /usr/share/postfix/main.cf.dist for a commented, more complete version


# Debian specific:  Specifying a file name will cause the first
# line of that file to be used as the name.  The Debian default
# is /etc/mailname.
#myorigin = /etc/mailname

smtpd_banner = $myhostname ESMTP $mail_name (Debian/GNU)
biff = no

# appending .domain is the MUA's job.
append_dot_mydomain = no

# Uncomment the next line to generate "delayed mail" warnings
#delay_warning_time = 4h

readme_directory = no

# See http://www.postfix.org/COMPATIBILITY_README.html -- default to 2 on
# fresh installs.
compatibility_level = 2


# TLS parameters
smtpd_tls_cert_file=/etc/ssl/certs/ssl-cert-snakeoil.pem
smtpd_tls_key_file=/etc/ssl/private/ssl-cert-snakeoil.key
smtpd_tls_security_level=may

smtp_tls_CApath=/etc/ssl/certs
smtp_tls_security_level=may
smtp_tls_session_cache_database = btree:${data_directory}/smtp_scache


smtpd_relay_restrictions = permit_mynetworks permit_sasl_authenticated defer_unauth_destination
myhostname = mail.falcot.com
alias_maps = hash:/etc/aliases
alias_database = hash:/etc/aliases
mydestination = mail.falcot.com, falcot.com, localhost.localdomain, localhost
relayhost =
mynetworks = 127.0.0.0/8 [::ffff:127.0.0.0]/104 [::1]/128 192.168.0.0/16
mailbox_size_limit = 0
recipient_delimiter = +
inet_interfaces = all
default_transport = smtp
relay_transport = smtp
inet_protocols = all
myorigin = /etc/mailname
virtual_alias_domains، والإشارة إلى ملف مقابلة الأسماء في المتغير virtual_alias_maps.
virtual_alias_domains = falcotsbrand.com
virtual_alias_maps = hash:/etc/postfix/virtual
/etc/postfix/virtual التقابلات بصيغة بسيطة نوعاً ما: كل سطر يحوي حقلين تفصلهما مسافة بيضاء؛ الحقل الأول هو الاسم المستعار، أما الحقل الثاني فيحوي قائمة بالعناوين البريدية التي يشير إليها ذلك الاسم. تغطي الصيغة الخاصة @domain.com جميع الأسماء المستعارة المتبقية في النطاق.
webmaster@falcotsbrand.com  jean@falcot.com
contact@falcotsbrand.com    laure@falcot.com, sophie@falcot.com
# The alias below is generic and covers all addresses within
# the falcotsbrand.com domain not otherwise covered by this file.
# These addresses forward email to the same user name in the
# falcot.com domain.
@falcotsbrand.com           @falcot.com
/etc/postfix/virtual the postfix table /etc/postfix/virtual.db needs to be updated using sudo postmap /etc/postfix/virtual.
virtual_mailbox_domains، والإشارة إلى ملف تقابل الصناديق البريدية في المتغير virtual_mailbox_maps. أما المتغير virtual_mailbox_base فيحوي المجلد الذي تخزن الصناديق البريدية فيه.
virtual_mailbox_domains = falcot.org
virtual_mailbox_maps = hash:/etc/postfix/vmailbox
virtual_mailbox_base = /var/mail/vhosts
virtual_uid_maps (أو المتغير virtual_gid_maps) إلى الملف الذي يحوي التقابلات بين العنوان البريدي ومستخدم النظام (أو المجموعة) الذي ”يملك“ هذا الصندوق البريدي. لمنح ملكية جميع الصناديق البريدية إلى مستخدم واحد أو مجموعة، يمكن استخدام الصيغة static:5000 التي تسند قيمة UID/GID ثابتة (القيمة 5000 هنا).
/etc/postfix/vmailbox بسيطة جداً أيضاً: حقلين تفصلهما مسافة بيضاء. الحقل الأول هو عنوان بريد إلكتروني ضمن أحد النطاقات الظاهرية، والثاني موقع صندوق البريد المرتبط معه (نسبةً إلى المجلد المحدّد في virtual_mailbox_base). إذا انتهى اسم صندوق البريد بشرطة مائلة امامية (/)، ستخزّن الرسائل الإلكترونية في صيغة maildir؛ وإلا سوف تستخدم صيغة mbox التقليدية بدلاً منها. تَستخدِم صيغة maildir مجلداً كاملاً لتخزين صندوق البريد، وكل رسالة مفردة تُخزَّن في ملف منفصل. أما في صيغة mbox، فيخزن صندوق البريد كله في ملف واحد، وكل سطر يبدأ بالصيغة ”From “ (كلمة From تليها مسافة) تشير إلى بداية رسالة جديدة.
# Jean's email is stored as maildir, with
# one file per email in a dedicated directory
jean@falcot.org falcot.org/jean/
# Sophie's email is stored in a traditional "mbox" file,
# with all mails concatenated into one single file
sophie@falcot.org falcot.org/sophie
soft_bounce = yes directive. By prepending a reject-type directive with warn_if_reject only a log message will be recorded instead of rejecting the request.
smtpd_client_restrictions بالأجهزة التي يسمح لها بالتواصل مع مخدم البريد الإلكتروني.
مثال 11.2. القيود المفروضة اعتماداً على عنوان العميل
smtpd_client_restrictions =
    permit_mynetworks,
    warn_if_reject reject_unknown_client_hostname,
    check_client_access hash:/etc/postfix/access_clientip,
    reject_rhsbl_reverse_client dbl.spamhaus.org,
    reject_rhsbl_reverse_client rhsbl.sorbs.net,
    reject_rbl_client zen.spamhaus.org,
    reject_rbl_client dnsbl.sorbs.net
permit_mynetworks directive, used as the first rule, accepts all emails coming from a machine in the local network (as defined by the mynetworks configuration variable).
warn_if_reject modifier to the reject_unknown_client directive: this modifier turns the rejection into a simple warning recorded in the logs. The administrators can then keep an eye on the number of messages that would be rejected if the rule were actually enforced, and make an informed decision later if they wish to enable such enforcement.
check_client_access directive allows the administrator to set up a blacklist and a whitelist of email servers, stored in the /etc/postfix/access_clientip file. Servers in the whitelist are considered as trusted, and the emails coming from there therefore do not go through the following filtering rules.
HELO (or EHLO) command, followed by the name of the sending email server. Checking the validity of this name can be interesting. To fully enforce the restrictions listed in smtpd_helo_restrictions the smtpd_helo_required option needs to be enabled. Otherwise clients could skip the restrictions by not sending any HELO/EHLO command.
مثال 11.3. القيود المفروضة على الاسم المُعلَن في EHLO
smtpd_helo_required = yes
smtpd_helo_restrictions =
    permit_mynetworks,
    reject_invalid_helo_hostname,
    reject_non_fqdn_helo_hostname,
    warn_if_reject reject_unknown_helo_hostname,
    check_helo_access hash:/etc/postfix/access_helo,
    reject_rhsbl_helo multi.surbl.org
permit_mynetworks لجميع الأجهزة في الشبكة المحلية بتقديم نفسها كيفما اتفق. هذه مهم، لأن بعض برامج البريد الإلكتروني لا تحترم هذا الجزء من بروتوكول SMTP بشكل كاف، ويمكن أن تقدم نفسها بأسماء غير منطقية.
reject_invalid_helo_hostname rule rejects emails when the EHLO announce lists a syntactically incorrect hostname. The reject_non_fqdn_helo_hostname rule rejects messages when the announced hostname is not a fully-qualified domain name (including a domain name as well as a host name). The reject_unknown_helo_hostname rule rejects messages if the announced name does not exist in the DNS. Since this last rule unfortunately leads to a lot of rejections, the administrators turned its effect to a simple warning with the warn_if_reject modifier as a first step; they may decide to remove this modifier at a later stage, after auditing the results of this rule.
reject_rhsbl_helo allows to specify a black list to check the hostname against an RHSBL.
permit_mynetworks as the first rule has an interesting side effect: the following rules only apply to hosts outside the local network. This allows blacklisting all hosts that announce themselves as part of the falcot.com network, for instance by adding a falcot.com REJECT You are not in our network! line to the /etc/postfix/access_helo file.
MAIL FROM من بروتوكول SMTP؛ يمكن التحقق من هذه المعلومات أيضاً بأساليب عديدة.
مثال 11.4. التحقق من المرسل
smtpd_sender_restrictions =
    check_sender_access hash:/etc/postfix/access_sender,
    reject_unknown_sender_domain,
    reject_unlisted_sender,
    reject_non_fqdn_sender,
    reject_rhsbl_sender rhsbl.sorbs.net
/etc/postfix/access_sender بعض المعاملات الخاصة ببعض المرسلين. هذا يعني إضافة بعض المرسلين إلى قائمة بيضاء أو سوداء عادة.
reject_unknown_sender_domain rule requires a valid sender domain, since it is needed for a valid address. The reject_unlisted_sender rule rejects local senders if the address does not exist; this prevents emails being sent from an invalid address in the falcot.com domain, and messages emanating from joe.bloggs@falcot.com are only accepted if such an address really exists.
reject_non_fqdn_sender الرسائل الإلكترونية التي تدّعي أنها ترد من عناوين ليس لها اسم نطاق كامل التوصيف. عملياً، هذا يعني رفض الرسائل الواردة من user@machine: ولذلك يجب إعلان العنوان على أنه user@machine.example.com أو user@example.com.
reject_rhsbl_sender rule reject senders based on a (domain-based) RHSBL service.
RCPT TO في بروتوكول SMTP. يضمن التحقق من هذه العناوين أيضاً شرعية الرسالة، حتى لو كانت أقل أهمية من التحقق من عنوان المرسل.
مثال 11.5. التحقق من المستقبل
smtpd_recipient_restrictions =
    permit_mynetworks,
    reject_unauth_destination,
    reject_unlisted_recipient,
    reject_non_fqdn_recipient,
    permit
reject_unauth_destination هي القاعدة الأساسية التي تتطلب أن تكون الرسائل الخارجية معنونة إلينا؛ أما الرسائل المرسلة إلى عنوان لا يخدمه هذا المخدم فسوف تُرفَض. دون هذه القاعدة، يسصبح المخدم محطة ترحيل مفتوحة تسمح بإرسال الرسائل الدعائية؛ أي أن هذه القاعدة إلزامية، والأفضل وضعها قرب بداية القائمة بحيث نقطع احتمال أن تسمح قاعدة أخرى للرسالة بالمرور قبل التحقق من وجهتها.
reject_unlisted_recipient الرسائل المرسلة إلى مستخدمين محليين لا وجود لهم، وهذا منطقي. أخيراً، ترفض القاعدة reject_non_fqdn_recipient العناوين ذات التوصيف غير الكامل؛ هذا يمنع إرسال رسالة إلى jean أو jean@machine، بل يجب استخدام العنوان الكامل بدلاً من ذلك، مثل jean@machine.falcot.com أو jean@falcot.com.
permit directive at the end is not necessary. But it can be useful at the end of a restriction list to make the default policy explicit.
DATA التابع لبروتوكول SMTP قبل إرسال محتويات الرسالة. لا يقدّم هذا الأمر أي معلومات بحد ذاته، فيما عدا الإعلان عما سيرد تالياً. لكن لا يزال إخضاعه للفحوصات ممكناً.
reject_unauth_pipelining رفض الرسائل إذا أرسلت الجهة المرسلة أمراً قبل إرسال الرد على الأمر السابق. هذا يحمي من عمليات التسريع الشائعة التي تستخدمها روبوتات الرسائل الدعائية، إذا أنها عادة لا تهتم أبداً بالردود وتركز فقط على إرسال أكبر عدد ممكن من الرسائل بأقصر زمن ممكن.
RCPT TO command by default.
EHLO خاطئ، سيعلم Postfix من هو المرسل ومن المستقبل عند إعلان الرفض. ويستطيع عندها تسجيل رسالة أوضح في السجلات وهذا غير ممكن إذا قوطعت عملية التبادل منذ البداية. بالإضافة لذلك، لا يتوقع بعض عملاء SMTP إخفاق عملية التبادل عند أوامر SMTP الأولية، وسيقل تشوش هذه العملاء عند استلام الرفض في وقت متأخر.
smtpd_delay_reject rule.
مثال 11.7. تفعيل المرشحات التي تعتمد على المحتوى
header_checks = regexp:/etc/postfix/header_checks
body_checks = regexp:/etc/postfix/body_checks
مثال 11.8. مثال عن الملف /etc/postfix/header_checks
/^X-Mailer: GOTO Sarbacane/ REJECT I fight spam (GOTO Sarbacane)
/^Subject: *Your email contains VIRUSES/ DISCARD virus notification
GOTO Sarbacane (برنامج لإرسال البريد بالكميات)، سوف ترفض الرسالة. يتحكم التعبير الثاني بموضوع الرسالة؛ فإذا كان يذكر تحذيراً من فيروس، يمكننا ألا نرفض الرسالة ولكن نحذفها مباشرة بدلاً من ذلك.
check_policy_service كقيد إضافي:
smtpd_recipient_restrictions =
    permit_mynetworks,
    [...]
    check_policy_service inet:127.0.0.1:10023
postgrey daemon and send it information concerning the relevant message. On its side, Postgrey considers the IP address/sender/recipient triplet and checks in its database whether that same triplet has been seen recently. If so, Postgrey replies that the message should be accepted; if not, the reply indicates that the message should be temporarily rejected, and the triplet gets recorded in the database.
smtpd_restriction_classes، وتُعرَّف بنفس أسلوب smtpd_recipient_restrictions. بعدها تحدد التعليمة check_recipient_access جدولاً يقابل بين المستقبل المحدد ومجموعة القيود المناسبة.
مثال 11.9. تعريف فئات التقييد في main.cf
smtpd_restriction_classes = greylisting, aggressive, permissive

greylisting = check_policy_service inet:127.0.0.1:10023
aggressive =
        reject_rbl_client sbl-xbl.spamhaus.org,
        check_policy_service inet:127.0.0.1:10023
permissive = permit

smtpd_recipient_restrictions =
        permit_mynetworks,
        reject_unauth_destination,
        check_recipient_access hash:/etc/postfix/recipient_access
مثال 11.10. الملف /etc/postfix/recipient_access
# Unfiltered addresses
postmaster@falcot.com  permissive
support@falcot.com     permissive
sales-asia@falcot.com  permissive

# Aggressive filtering for some privileged users
joe@falcot.com         aggressive

# Special rule for the mailing-list manager
sympa@falcot.com       reject_unverified_sender

# Greylisting by default
falcot.com             greylisting
clamav from the homonymous package.
clamav-milter مهمة الوصل ما بين مضاد الفيروسات وبين مخدم البريد الإلكتروني. الملتر (milter، اختصار mail filter) هو برنامج ترشيح مصمم خصيصاً للتواصل مع مخدمات البريد الإلكتروني. يستخدم الملتر واجهة برمجية تطبيقات (API أو application programming interface) تعطي أداءً أفضل بكثير من المرشحات الخارجية. قدم Sendmail الملاتر أول مرة، لكن سرعان ما لحق Postfix به.
dpkg-reconfigure clamav-milter. عند طلب ”Communication interface with Sendmail“، أجب عليه بإدخال ”inet:10002@127.0.0.1“.
dpkg-reconfigure clamav-base.
/etc/postfix/main.cf:
# Virus check with clamav-milter
smtpd_milters = inet:[127.0.0.1]:10002
systemctl reload postfix should be run so that this change is taken into account.
include directive it must have one.
Name: example.org
Type: TXT
TTL:  3600
Data: v=spf1 a mx -all
falcot.org entry.
#host -t TXT falcot.orgfalcot.org descriptive text "v=spf1 ip4:199.127.61.96 +a +mx +ip4:206.221.184.234 +ip4:209.222.96.251 ~all"
postfix mail server can check the SPF record for incoming emails using the postfix-policyd-spf-python package, a policy agent written in Python. The file /usr/share/doc/postfix-policyd-spf-python/README.Debian describes the necessary steps to integrate the agent into postfix, so we won't repeat it here.
/etc/postfix-policyd-spf-python/policyd-spf.conf, which is fully documented in policyd-spf.conf(5) and /usr/share/doc/postfix-policyd-spf-python/policyd-spf.conf.commented.gz. The main configuration parameters are HELO_reject and Mail_From_reject, which configure if emails should be rejected (Fail) or accepted with a header being appended (False), if checks fail. The latter is often useful, when the message is further processed by a spam filter.
Header_Type must be set to AR.
postfix, adds a digital signature associated with the domain name to the header of outgoing emails. The receiving party can validate the message body and header fields by checking the signature against a public key, which is retrieved from the senders DNS records.
opendkim-genkey -s SELECTOR -d DOMAIN. SELECTOR must be a unique name for the key. It can be as simple as "mail" or the date of creation, if you plan to rotate keys.
مثال 11.11. Create a private key for signing E-Mails from falcot.com
#opendkim-genkey -s mail -d falcot.com -D /etc/dkimkeys#chown opendkim.opendkim /etc/dkimkeys/mail.*
/etc/dkimkeys/mail.private and /etc/dkimkeys/mail.txt and set the appropriate ownership. The first file contains the private key, and the latter the public key that needs to be added to the DNS:
Name: mail._domainkey
Type: TXT
TTL:  3600
Data: "v=DKIM1; h=sha256; k=rsa; s=email; p=[...]"
-b 1024 to chose a smaller keysize. If opendkim-testkey succeeds, the entry has been successfully set up. The syntax of the entry is explained here:
SOCKET and RUNDIR must be chosen in /etc/default/opendkim. Please note that SOCKET must be accessible from postfix in its chrooted environment. The further configuration is done in /etc/opendkim.conf. The following is a configuration excerpt, which makes sure that the Domain "falcot.com" and all subdomains (SubDomain) are signed by the Selector "mail" and the single private key (KeyFile) /etc/dkimkeys/mail.private. The "relaxed" Canonicalization for both the header and the body tolerates mild modification (by a mailing list software, for example). The filter runs both in signing ("s") and verification ("v") Mode. If a signature fails to validate (On-BadSignature), the mail should be quarantined ("q").
[...]
Domain                  falcot.com
KeyFile                 /etc/dkimkeys/mail.private
Selector                mail

[...]
Canonicalization        relaxed/relaxed
Mode                    sv
On-BadSignature         q
SubDomains              yes

[...]
Socket                  inet:12345@localhost

[...]
UserID                  opendkim
KeyTable), domains (SigningTable) and to specify internal or trusted hosts (InternalHosts, ExternalIgnoreList), which may send mail through the server as one of the signing domains without credentials.
/etc/postfix/main.cf make postfix use the filter:
milter_default_action = accept
non_smtpd_milters = inet:localhost:12345
smtpd_milters = inet:localhost:12345
/etc/postfix/master.cf instead.
/usr/share/doc/opendkim/ directory and the manual pages opendkim(8) and opendkim.conf(5).
_dmarc and the action that should be taken when emails that contain your domain as the sending host fail to validate using DKIM and SPF.
#host -t TXT _dmarc.gmail.com_dmarc.gmail.com descriptive text "v=DMARC1; p=none; sp=quarantine; rua=mailto:mailauth-reports@google.com"#host -t TXT _dmarc.yahoo.com_dmarc.yahoo.com descriptive text "v=DMARC1; p=reject; pct=100; rua=mailto:d@rua.agari.com; ruf=mailto:d@ruf.agari.com;"
reject all emails pretending to be sent from a Yahoo account but missing or failing DKIM and SPF checks. Google Mail (Gmail) propagates a very relaxed policy, in which such messages from the main domain should still be accepted (p=none). For subdomains they should be marked as spam (sp=quarantine). The addresses given in the rua key can be used to send aggregated DMARC reports to. The full syntax is explained here:
postfix mail server can use this information too. The opendmarc package contains the necessary milter. Similar to opendkim SOCKET and RUNDIR must be chosen in /etc/default/opendmarc (for Unix sockets you must make sure that they are inside the postfix chroot to be found). The configuration file /etc/opendmarc.conf contains detailed comments and is also explained in opendmarc.conf(5). By default, emails failing the DMARC validation are not rejected but flagged, by adding an appropriate header field. To change this, use RejectFailures true.
smtpd_milters and non_smtpd_milters. If we configured the opendkim and opendmarc milters to run on ports 12345 and 54321, the entry in /etc/postfix/main.cf looks like this:
non_smtpd_milters = inet:localhost:12345,inet:localhost:54321
smtpd_milters = inet:localhost:12345,inet:localhost:54321
/etc/postfix/master.cf instead.
saslpasswd2، الذي يأخذ عدة بارامترات. يحدد الخيار -u نطاق المصادقة، الذي يجب أن يطابق المتغير smtpd_sasl_local_domain في إعدادات Postfix. يسمح الخيار -cبإنشاء مستخدم، ويسمح -f بتحديد الملف الذي تريد استخدامه لتخزين قاعدة بيانات SASL إذا كنت تريد تخزينها في مكان مختلف عن المكان الافتراضي (/etc/sasldb2).
#saslpasswd2 -u `postconf -h myhostname` -f /var/spool/postfix/etc/sasldb2 -c jean[... type jean's password twice ...]
/etc/sasldb2 أيضاً رابطاً رمزياً يشير إلى قاعدة البيانات التي يستخدمها Postfix، باستخدام الأمر ln -sf /var/spool/postfix/etc/sasldb2 /etc/sasldb2.
postfix إلى المجموعة sasl، حتى يستطيع الوصول لقاعدة البيانات التي يملكها حساب SASL. كما نحتاج لبضعة بارامترات جديدة لتفعيل SASL، ويجب ضبط المتغير smtpd_recipient_restrictions للسماح للعملاء الذين صادقوا هويتهم باستخدام SASL بإرسال البريد الإلكتروني دون قيود.
مثال 11.12. تفعيل SASL في /etc/postfix/main.cf
# Enable SASL authentication
smtpd_sasl_auth_enable = yes
# Define the SASL authentication domain to use
smtpd_sasl_local_domain = $myhostname
[...]
# Adding permit_sasl_authenticated before reject_unauth_destination
# allows relaying mail sent by SASL-authenticated users
smtpd_recipient_restrictions =
    permit_sasl_authenticated,
    permit_mynetworks,
    reject_unauth_destination,
[...]
/etc/postfix/master.cf file. To turn off authentication at all for port 25 (smtpd service) add the following directive:
smtp      inet  n       -       y       -       -       smtpd
    [..]
    -o smtpd_sasl_auth_enable=no
    [..]
AUTH command (some very old mail clients do), interoperability with them can be enabled using the broken_sasl_auth_clients directive.